This toolkit describesthe process for creating digital videos using theUnboxing the Archive process. It will alsoinclude technical guidance for help in historical research, video editing, and acquiring images.
Unboxing the Archive aims to make documents and collections in archives, libraries, and local historical organizations accessible to the general public through digital videos. This project spotlights narratives of people who have been obscured in archives and erased from common historical interpretations. It puts particular focus on African American history in Essex County, Massachusetts (towns such as Salem, Beverly, and Lawrence) and the contributions of African Americans to cultural, political, and economic life. The project emerged from finding fascinating stories about African Americans in the repositories of cultural organizations in New England and realizing that they had been vastly overlooked. Rather than publish these stories in traditional books and journals, the project hopes to share these narratives with a wider audience through digital videos. It demonstrates presence, struggle, and survival within history.
Unboxing the Archives challenges collection holders to revisit their archive and ask what needs more investigation that has not traditionally occurred during the archival process. It aims to tell stories that have been neglected while illuminating the structures and systems that have led to erasure. Unboxing the Archives has historically focused on histories of Black and Indigenous people in New England, a necessary topic that requires continued study. With this toolkit, it hopes that topics outside this region as well as projects that intersect with queer, migrant, disability, or other types of marginalized history can also be produced by users.
This digital tool for the Unboxing the Archive project offers guidance to archivists, librarians, scholars, and students who wish to better examine collections at their organizations. In aiming to meet the needs of those with institutional support, this toolkit acknowledges it could exclude those without access to these resources, such as community archivists who often perform the labor of making archives directed at community members. This toolkit focuses on institutional participants because they often have better access to technological capabilities such as digitization, video software, and research depositories needed to make these video projects. However, in order to accommodate community archivists, it also offers a resources section to help those who may not have the ability to acquire audio and video software by listing other free or more accessible services.
What do videos produced under the Unboxing the Archive project look like? The Reckonings Project, a local history platform for the community- archivist, has launched a website for Unboxing the Archive. You can view the videos on the site and see what work occurred in the past in partnership with the National Park Service Essex National Heritage Area. Typically, videos include a set of images selected from a collection or found online and a voice-over from the author describing a narrative history of the event, person, or time period. They are based on a written script that has been fully fact-checked. Creators obtain permissions for all images prior to the workings being published.
The following pages of the toolkit will describe the process for creating digital videos using the Unboxing the Archive process. They will also include technical guidance for help in historical research, video editing, and acquiring images.
2. Selecting the Collection
Unboxing the Archive has found that digital storytelling projects work best when they are driven by historical documents. Creators are highly encouraged to find a collection of documents on a subject, event, or period to provide a basis for their video, rather than choosing a theme first. This collection will form the core of the video, and creators can include additional research and materials if needed. Unboxing the Archive hopes creators will think broadly about what constitutes a historical collection. Beyond a box of papers and objects from a traditional archive, a group of images, photographs, illustrations, newspaper clippings, or public records (such as those of military service) could all function as historical documents upon which a digital storytelling project could be derived.
In fact, for the most compelling projects, creators may want to combine different types of collections across multiple mediums. However, digital video projects are a visual format, and having high-quality images will be necessary for guiding the narrative and aiding these viewers in understanding the history being told. Creators may want to concentrate on collections that have vast visual components and ensure that they have the capability of making high-quality reproductions through photographing or scanning their materials.
If a creator does want to start with a theme rather than a specific collection, they should establish a tight scope, pertaining to a specific time period, place, or person. Too broad of a theme will make it difficult to effectively synthesize research and create a clear narrative.
3. Researching the Collection
Critical Archival Practices
Researchers should be careful while reading historical documents. Some historians employ “reading against the grain,” a method in which historical documents are to be read and understood from the perspective of those that were marginalized within a history. This is also called “bottom-up” or social history. For example, this might involve reinterpreting records of crime as acts of resistance against an unjust society or framing workers breaking employment contracts as attempts to negotiate for better working conditions. However, some scholars, such as Marissa J. Fuentes, warn against reading all documents this way, arguing that archives themselves can reinscribe or reproduce imbalances in power. Rather, these researchers employ a method called “reading alongside the bias grain” a method in which systems of oppression written into history are made apparent when examining sources, while also taking into account the humanity of the people within the archive.
Creators need to carefully think about why certain subjects are portrayed in certain ways in archival material and who collected and curated the objects in order to depict them as such. Most especially, creators should interrogate who (or what population) is missing or has been erased from the archive itself. Creators might also contemplate what types of objects, such as oral histories, are not as often part of archival collections. Additionally, some historians such as Jessica Marie Johnson urge us to consider examining “null values” or the silences within the archive. This method considers spaces that exist outside of the making of historical documents, where marginalized people found autonomy and joy while subverting the surveillance of those in power. Creators need to think critically about what is both evident and missing within their collections, and may choose to highlight this in the script of their videos.
Secondary Sources
In addition to primary sources, which record the perspective of people of the time period, secondary sources are written by historians and scholars after the events take place. They can provide significant historical context in a digital storytelling project. For example, secondary sources can offer context on how a certain object was used, or the types of themes present in a photo or painting that might not be obvious to the viewer of the primary material. Creators must be extremely careful about the information gleaned from secondary sources, especially online, and websites such as Wikipedia are typically not sufficient foundations for historical evidence. Vetting secondary resources is mandatory for doing great work. The best sources are articles published in an academic journal or books published by a university press. Websites such as a JSTOR or Project Muse typically provide some of the best resources. However, these websites are typically hidden behind a paywall or inaccessible to those without a university membership. Creators may want to consult their local library for the best way to access reputable sources. The online library Archive.org often has access to academic books for free that can be borrowed on a short-term basis. Users must also be certain to offer proper attribution to the secondary sources to avoid unintentional plagiarism.
4. Looking Outside the Collection
The search tool and homepage of Family Search.
In-Person Archive Visits
For digital history projects focused on a particular local area or individual, local libraries, historical societies, and university archives often serve as the best places for finding historical documents related to a particular person, place, or event. As this guide is aimed at employees of those organizations, this means looking through the creator’s institution’s archive to find information about the collection. If looking outside, most historical societies or archives allow public visitation with proper notice. Creators should reach out to archives by email or online form before visiting to inquire about collections. Be sure to ask for finding aids that detail the material in the collection, and users may want to set up appointments with archivists to help kickstart research. Many organizations also post this information on their website and creators can search for archival collections on Archivegrid, a centralized database of documentary material. However, this database is not comprehensive and excludes most local organizations. Reproduction of documents can often be difficult, especially at smaller institutions. Creators should bring a device (such as a smartphone) capable of scanning documents to any archival visit and download a free scanning app such as Adobe Scan, Microsoft Lens, or Scanner Pro. Creators must ask before visiting about policies around reproduction of images and their usage for digital videos, as many local organizations may charge for image use. For a digital storytelling project, creators should capture clear images of documents in order for them to be successfully utilized in the visual portion of the project.
Creators may need to carve out significant time to visit an archive. There will need to be sufficient time to read through documents and scan those with the most pertinent information. This holds especially true for local historical societies and archives that have incomplete finding aids requiring extra time to be spent sorting through the contents.
Digital Research Tools
To supplement research done in the creator’s institution’s archive or an archive they have previously visited, online research tools provide an excellent supplement of information for digital storytelling projects. These tools often contain many different types of vital records, documents, legal papers, grave markers, and other historical resources that may be helpful for generating additional information on a person, place, or event. Family Search, a free tool, includes a massive collection of records relating to individuals and localities. Family Search is often best utilized when a creator finds the name of a person in their institution’s collection and then can uncover more information about them via Family Search’s search engine. For example, as shown in the image above, creators can research a person by name, which will pull up possible census, immigration, birth, marriage, death, military service, probate, court, and other types of records.
Creators should be careful to verify that records are not associated with a different person of the same name by cross-referencing sources of identifying information, such as location or birth record. Family Search can also be navigated by type of record and narrowed by location.
Newspaper databases also provide an excellent source of information on people and especially local events in history. These databases allow creators to search through the text of newspapers via keywords and filter by time period. However, researchers should be careful to ensure their use of keywords fits the historical time period. For example, in searching for results about sailors in the 19th century, more helpful results will be yielded using terms “mariner” or “seaman” that were more common during the time. Unfortunately, many of the most prominent newspaper databases such as Early American Newspapers, Gale Cengage databases, Proquest, or Accessible Archives sit behind a paywall. Creators can check if their institution has access to these databases.
Creators can often use memberships to local library consortiums or universities in order to access newspaper databases. Major public libraries such as Boston Public Library and New York Public Library also allow their patrons to access many of these major resources. In addition, the Library of Congress has a free digital collection of newspapers through Chronicling America, although its search function is limited. Some major national newspapers such as The New York Times allow free access to their entire archives.
Many local towns also have vital records concerning the birth, death, and marriage of historical inhabitants. In Massachusetts, these records have been uploaded to a website. In addition, in the 19th century and early 20th century, some historians began writing histories of local towns and counties. These histories and their narratives about American history need to be examined critically, as they often celebrate only the achievements of white men, while obscuring systems of oppression that allowed for such, and the history of marginalized people that was systemically left out of the record. However, they still often provide a wealth of information on local communities and contain connections to other sources. These histories can be found for free on Archive.org or through Google Books.
An Example of a local history from the late nineteenth century. “History of Fall River,” published in 1911.
5. Finding Outside Images
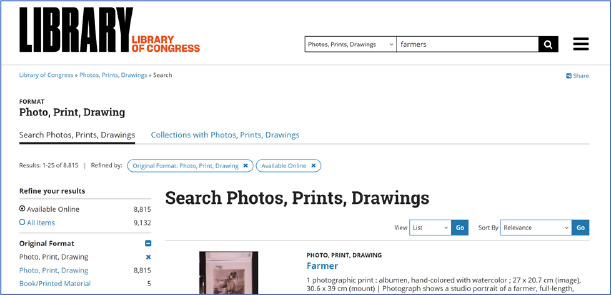
A Search for “farmers” at the Library of Congress website and limited by “Photo, Print, Drawing.”
One of the most difficult parts of creating a digital storytelling video can be acquiring images. For this reason, Unboxing the Archive recommends utilizing images from the creator’s institution as the basis for the project. However, if a creator needs additional material, especially if the video is based on written historical documents from hundreds of years in the past, finding high quality images can be challenging. Creators may also want to vary the type of images utilized in their video, as only relying on one type of photograph or image, may create monotony for viewers.
Creators may need to be resourceful in their search for images, and be willing to consider textual documents and newspaper clippings as images themselves. Maps or images of the physical space of a place in a video can be helpful for orienting viewers. Acquiring images for the video should not be seen as a separate process from the research itself and creators should prioritize finding images as the foundation for making an engaging story. The state of Massachusetts has compiled many historical images together in the Digital Commonwealth. Other free use images can be found on Wikimedia Commons, or through the search function of the Library of Congress or National Archives website, via filtering searches by medium, as seen below.
However, all images and reproductions used in your digital storytelling project will be subject to copyright restriction. Most historical images found on the internet will need appropriate permissions to utilize in any kind of published video. Creators must reach out to the organizations who own images in order to secure their permission and appropriately credit images in your video. Some organizations may charge for using and reproducing their images.
6. Creating a Storyboard
Narratives
Creators should not just think about a video as a collection of disparate images and audio, but as a narrative with a specific purpose aimed at its viewer. Some videos may have an argument, making a specific point about history. For example, a video about images of 19th century clothing could assert that transformations in gender expectations within the family are reflected in changes in clothing styles. Arguments can be helpful in thinking about how to link documents together and how to read documents themselves.
Yet not all digital storytelling projects need to have an argument. Some may just wish to convey important information about a community, tell the story of a misunderstood historical event, or highlight the life of a marginalized figure. Even with these projects, creators should think about the purpose of the project and ensure their video script and images are selected to best convey these ideas. This will be expressed through the creation of the storyboard.
The Storyboard
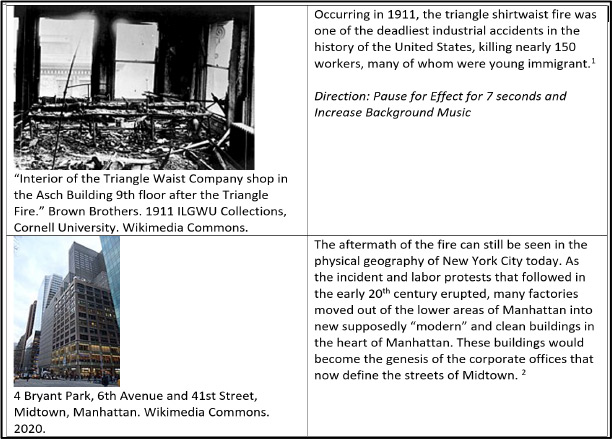
After undertaking research and acquiring images, the next step will be to create a storyboard of the project. A storyboard places images along text to give an overview of the arc before the video is recorded. Most digital storytelling videos will utilize voiceover, creating a narrative based on the research completed on the topic that will be read alongside the images. In a storyboard, creators will select each image and then write the voiceover or text that will accompany each image next to it as seen in the example above. This text will be based on both the creator’s interpretation of documents in the archive and their secondary research into the topic. These panels of text should create a coherent narrative history of the event, person, or place the video describes.
Each panel should match up directly and straightforwardly with the accompanying image as seen in the example above
All images should include a full citation of the source in order to keep track of permissions. The text should also include citations with a clear source for both the primary documents referenced from the collection and the secondary sources utilized. Creators may also want to include video direction for the images in the storyboard, such as panning and zooming the video, pausing for effect, or increasing the background music at certain points. This will make decisions easier during the video editing process.
The storyboard functions as a type of script for the video. Any changes can be done with both the text and images in mind. When the storyboard is finished, it should be read out loud so that the creator can understand how the video will sound to an audience.
7. Audio Recording
An example of editing audio in Audacity.
If a creator’s video includes voiceover work, as the Unboxing the Archive projects have in the past, audio recording will be a necessary part of the process. This work should always occur after the storyboard has been completed, and before video editing, to allow for the least amount of changes during video editing. It is important to record clear and understandable audio. Recording audio directly from your computer typically produces low-quality sound with background noise. Recording into some kind of microphone (even earbuds) can improve the sound quality and the production of your digital storytelling project. Creators may also be able to record via a smartphone, although this can still produce substantial background noise.
Editing audio recordings before putting them directly into the video editing software will typically improve the ease of audio editing. Even the most advanced video software can present challenges in editing audio easily and/or directly.
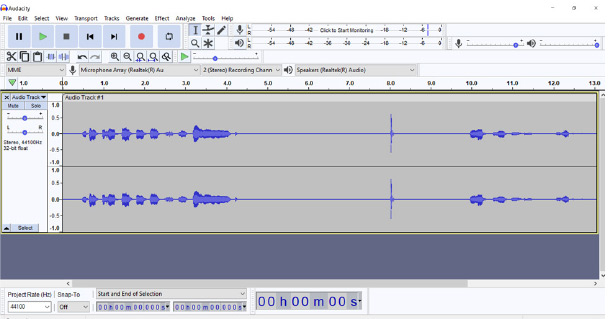
Free audio editing software such as Audacity allows creators to cut poor-quality takes and record consistent audio with simple tools.
In terms of creating audio, anyone performing voiceover work should practice the storyboard multiple times and become comfortable with the script before recording to minimize errors that will emerge without a good comprehension of the material before recording. Voiceovers should be spoken clearly and slowly, and be recorded in an area with little or no background noise. If any part of the script seems as though it may be difficult to understand as recording progresses, it should be changed during the process of audio recording. Allow for significant time to be dedicated to audio recording. Creators must also be mindful to create audio pauses to allow for edits and splices to be made of multiple recordings in case of errors. Creators may want to listen back to their recordings in between takes, in order to find mistakes and areas that need to be rerecorded and keep a record of this.
Audio clips will need to be cut down and the least quality takes should be deleted. Creators should expect to spend a considerable amount of time in this portion of the process. In addition, some software such as Audacity often has the capability to eliminate background noise and improve the volume of recordings, which creators should consider using if additional corrections are needed during the editing process.
8. Video Editing
Example of video with title labeling image and captions below.
The Basics of Video Editing
Editing your video will require software that allows a creator to import audio files and images and sync them up to make their video. The best video editing software to use is Adobe Premiere or Final Cut Pro, although these are expensive software programs that require licenses. Apple product owners can utilize iMovie for free which has fairly expansive capabilities, while Windows computers have access to Video Editor in the photos app.
When making a video, creators may want to work in smaller parts mirroring the storyboard. Importing a small amount of audio, and then the matching images, or including a couple of images and then importing the audio, will help to create a more coherent story. Taking the process “one step at a time,” can produce the least amount of revisions. However, starting with a strong storyboard and audio recordings are the critical first steps that will lead to the least amount of changes in the video editing process.
Many historical documentaries and digital storytelling projects add motion to static images. Watching a series of still images can be uneventful for many viewers and may cause the audience to lose focus. Images in film editing software can be panned, meaning the image moves across or up and down the screen. They can also zoom and focus closer in on aspects of the video. Often employing both techniques at once can be the most engaging for viewers. Creators may want to focus on a certain aspect of the video, such as the face in a portrait or the title of a document. Panning and zooming toward the key part of an image can produce the most impactful viewing experience. At other times keeping an image relatively still can highlight its importance when other images in the video employ motion. In addition, other film transitions can be employed to fade out a certain image to black, or have an image dissolve into view slowly. However, creators must be careful when employing these effects, as they can distract from the narrative if transitions are too harsh or overused.
Text and Music
Images alone often do not provide enough context for the viewer. Many images may need to have text added to them in the form of a title, such as locating the place, time period, event, or person described in the image. However, describing the image discussed in the audio for the project can often help to alleviate an overreliance on titles in videos, and is an important part of making videos accessible through Audio Descriptions (covered later in this section). If titles are employed, utilizing effects such as dissolve text can help the image feel more integrated into the visuals which they describe.
Videos often employ music softly in the background. This may be a continuous song or multiple songs that shift with the tone and themes shown in the project. Music should fit the tone being expressed in each moment. Creators should not use music they feel will interfere with narration and should adjust music volumes to suit the audio or intended dramatic effect. Creators should ensure that all music they utilize is royalty free or properly licensed. At some point in the video, a creator may also wish to have short breaks or pauses which allow the viewer to reflect on the information being transmitted. Music can be utilized during these moments to communicate a tone of reflection or celebration.
Credits and Titles
At the beginning of your video include a short title of the video. Most video software will allow you to insert a black or white screen and then include text over it. The title may reference the collection that the video emphasizes or a broader theme about history. Titles should be clear and short. At the end of the video, include a section for credits. Credit each member of the team who contributed to the project with the work they completed such as “editing by,” “research by,” or “music from.” Avoiding job titles, and incorporating the actual work performed by those involved, creates a more equitable distribution of credits. All images in your video should be credited. Many archives and museums will have specific language required for crediting them or their collections, be sure to inquire when you ask permission for the images. Ensure they receive credit as titles over images in the video or in the end credits.
Accessibility and Captions
All digital storytelling videos must be made as accessible as possible. Videos should include captions, and most video software will allow you to directly upload your script and then utilize it to make captions. If using software that autogenerates captions, such as Adobe Premiere, be sure to recheck the captions after the transcription process and make the appropriate changes. Do not rely solely on auto-captioning.
Videos may also need to add audio description, a separate audio track to explain the images featured in the content for blind or visually impaired viewers. This could require a separate video and audio recording and creators need to be aware of this at the start of the process. The Federal government’s 508 compliance statute is a good starting place for ensuring the accessibility of content.
9. Publishing the Video
The most widely accessible place to upload many videos for the general public is Youtube or similar video sites such as Vimeo. Videos uploaded to Youtube can be easily shared or embedded in a website or social media page. However, Youtube has strict restrictions on copyright, length of videos, and images, so creators should ensure that their video has attained the necessary permissions before uploading. Many social media sites will allow creators to upload videos directly to them as well. However, they may have restrictions on the length of a video or require a video to have ads run alongside longer content. They may also truncate or compress video reducing it’s quality. Exporting a long video from software and uploading it to social media or Youtube will require a significant amount of time and internet bandwidth, often multiple hours, and creators should be prepared for this process. If creators are only sharing videos privately, google drive or Dropbox typically offers enough storage to share at least one video.
10. Resources for the Community Archivist
Although this guide has been targeted at archivists who work for organizations and institutions, communities should also have access to resources to make digital video projects. The following includes a list of resources for community archivists that may be helpful for their digital video project.
Archivegrid, a search engine for archive collections, typically at larger institutions
Archive.org, a free repository of archival material and secondary sources that can be loaned out, similar to a library
Chronicling America, an open database of newspaper from the Library of Congress from 1777 to 1963
Specialized Archival Collections
Slavery Images, a collection of free use images related to slavery and the slave trade from across the world
Digital Commonwealth, a collection of images and documents compiled from repositories across Massachusetts and the Northeast
Doc South, a collection of documents focused around the southern states from the 18th, 19th, and early 20th century
Digital Schomburg, a collection from the New York Public Library of mainly New York and American Northeast documents of Black life through photographs, letters, and periodicals
Digital Library of the Caribbean, a vast collection of open-source artifacts including personal, periodical, governmental, and beyond based around the history of the Caribbean and the Americas from 16th century-Present
Slave Societies Digital Archive, a collection of images and artifacts that link the history of slavery to the present day Caribbean and Latin America. (website also available in Spanish)
Freedom on the Move, a collection of over 30,000 fugitive slave ads from periodicals from the United States and the Caribbean from the 18th and 19th century
Slave Voyages, an open-source collection of the thousands of records of the voyages made across the Atlantic and internally throughout the Americas that carried enslaved people as they were sold, bought, and traded